
- Cub Scout Activities
- |
- Cub Scout Arrow of Light Adventures & Requirements
- |
- Cub Scout Bears Adventures & Requirements
- |
- Cub Scout Tigers Adventures & Requirements
- |
- Cub Scout Webelos Adventures & Requirements
Cub Scouts Birdhouse Plans

Building a birdhouse is such a great opportunity for our all of our Cub Scouts. They learn about taking something simple, such as wood, and turning it into something useful. They learn about using tools safely. And they learn about helping other creatures.
In the new Cub Scout Adventure program, there are several ranks that can build a birdhouse to complete an adventure.
Bear Adventure – Baloo the Builder 5: Build your project.
Webelos Elective Adventure – Build It 4: Build your carpentry project.
There are two ways that you can do this:
1) By purchasing a birdhouse kit, or
2) By buying and cutting the wood yourself.
Buying the kit is more expensive, but the wood is precut for you. Doing it yourself is less expensive, but you have to do more work.
If you decide to do it yourself, take advantage of my free birdhouse plans.
DIY Supply List:
5 feet of 1- x 6-inch board cut into the following pieces (see diagram below):
2 – 10” pieces
1 – 7 ¾” pieces
2 – angled pieces 10″ on one side & 8″ on the other
1 – 4” piece

You’ll also need
1 5/8-inch galvanized deck screws
2-inch galvanized finishing nails
Fine sandpaper
Wood glue
Building Instructions:
Assemble the birdhouse as shown in this drawing. Step-by-step instructions are below.
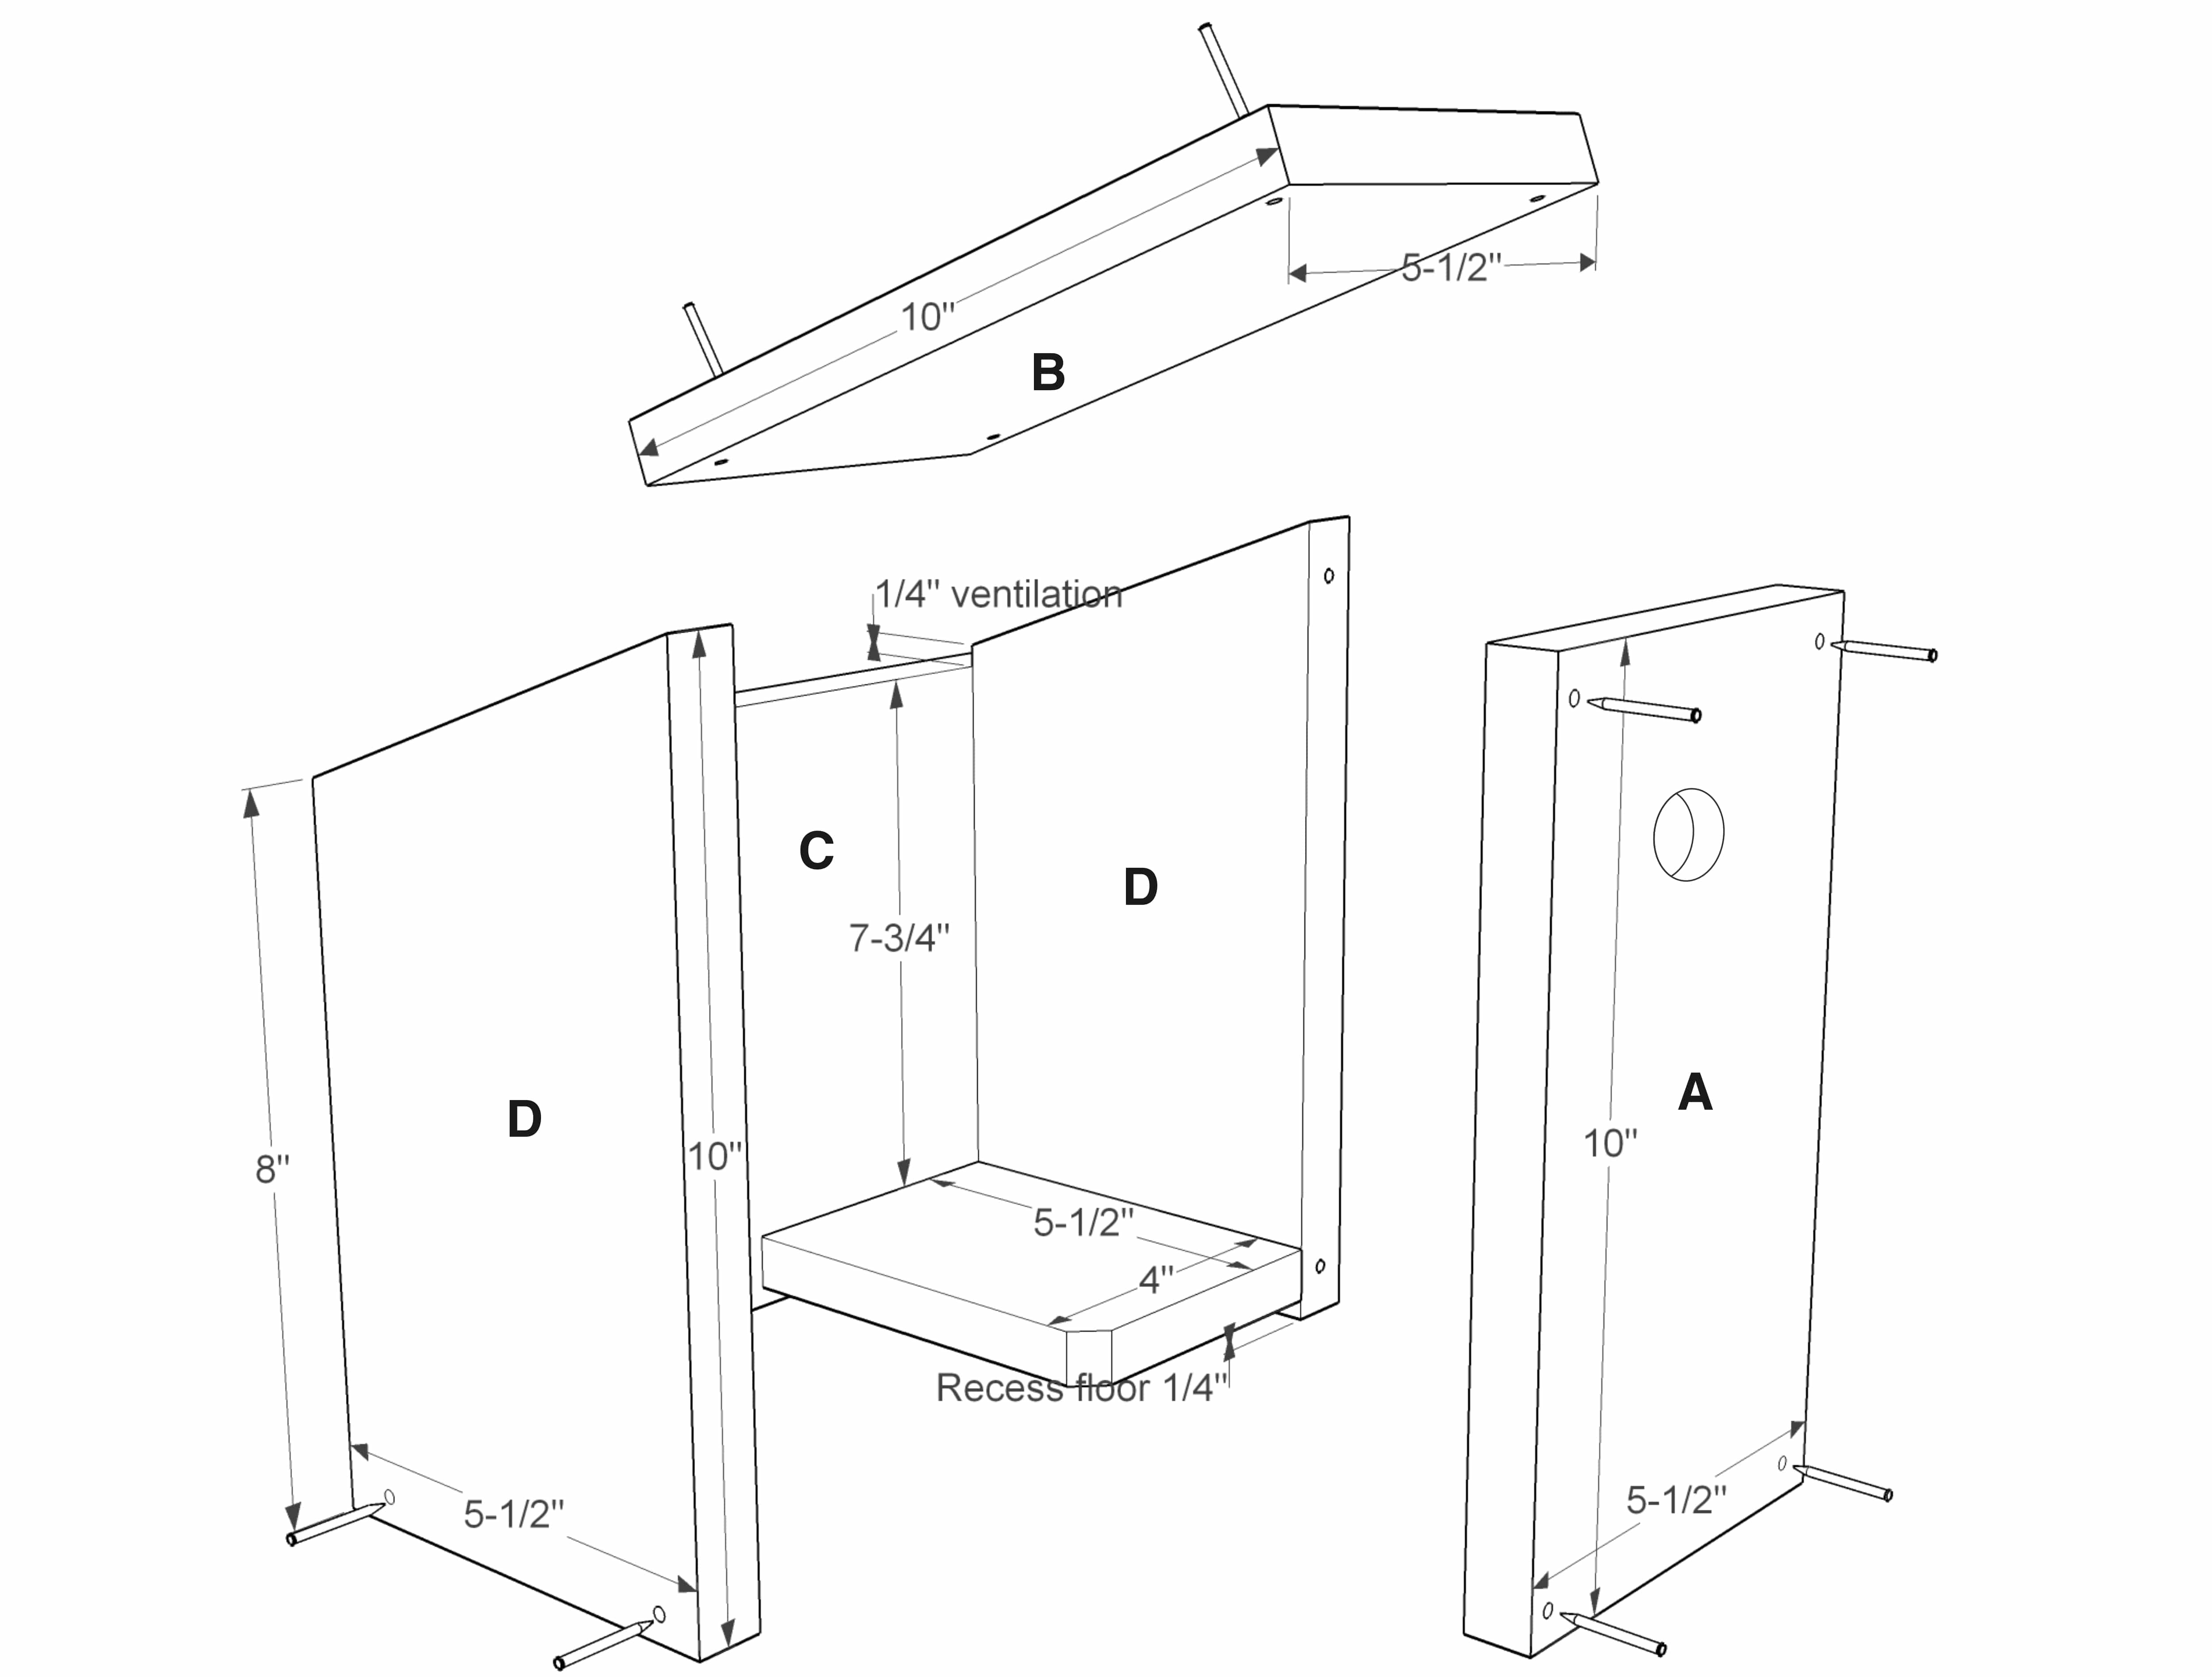
1. Precut a board for each boy following the first diagr
am.
2. Drill the entrance hole about 2 ½” from the top of the front piece. The hole should be about 1 ½” in diameter. Make sure the hole is centered on the board. Unless you have a manual hand drill and a lot of time for the boys to crank the drill, you’ll probably want to predrill the hole.
3. Attach the front to the sides by using the 1 5/8” deck screws. You might want to predrill holes in the front piece to make it easier for the boys.
4. Attach the back to the sides with the 2” finishing nails. The holes for the nails can also be predrilled.
5. Cut about ½” off each corner of the floor for drainage.
6. Attach the floor about ¼” up from the bottom of the house on the sides and back with the 2” finishing nails. Don’t nail the floor from the front because you won’t be able to open it for cleaning.
7. Attach the roof to the sides with 1-5/8-inch deck screws.
8. Hang your birdhouse outside, and watch for the new occupants to settle in!
Yours in Scouting,
Sherry
P.S. Want to identify the birds that are living in the birdhouse? Read about the Ultimate Guide to Bird Identification. Do you want to make a treat for them too? My Bird Feeders for Kids to Make series shows you three easy-to-make bird feeder styles.
15 responses
-
[…] Tigers – Birdhouse […]
-
[…] Tigers – Birdhouse […]
-
[…] Check out these birdhouse plans if your Cub Scout wants to build […]
-
[…] Build and hang a birdhouse. […]
-
[…] Chair Chest Table Tray Birdhouse […]
-
Any recommendations on the type of wood to buy for use outside. I can check other sources but was curious on your thought.
On Step 6 for attaching the floor it says about not nailing from the front to be able to clean out. I do not see how this is done if the floor is nailed to the sides and the front and back are screwed unless the thought is to remove the front by unscrewing the deck screws.
Last question is if it is recommended or not based on the wood used for type of paint or finish on the birdhouse that would not be harmful or problem to the birds themselves
Thank you.-
@OhioJohn,
The floor of this birdhouse is attached by nailing from the back and from both sides. The front is attached to the sides with deck screws so it can be easily removed for cleaning out old nesting material.
We used pine boards for our project because it was fairly inexpensive. As for what type of finish you should apply, it depends on who you listen to. From what I have read, birding purists prefer raw, unfinished wood, as it is safest for the birds. Cedar boards will last longer than pine due to its natural resistance to insects and rot, but it will still decay over time. If you do choose to paint or stain your birdhouse, choose a finish that is non-toxic and do not apply it to the hole opening, the vents, or to the inside surfaces. The color that you choose is important as well. During the summer, black and other dark colors will absorb heat, causing the inside temperature to rise to unsafe levels for the birds. On the other hand, bright colors could attract the attention predators. Several sources recommend camouflage or natural colors- browns, greens, or grays to help conceal the birds from predators.
As a subscriber to monthly do-it-yourself gardening type magazine, many issues show photographs of birds using highly decorated, multi-colored birdhouses. All I can tell you is to let your Cub Scouts have fun with this project, they will be learning new skills and methods to improve the habitat for birds in their region.
-
-
[…] requirement 3 from the Baloo the Builder adventure by constructing a bird feeder or a bird house as one of the […]
-
[…] requirement 3 from the Baloo the Builder adventure by constructing a bird feeder or a bird house as one of the […]
-
Back in the day, building and putting out a birdhouse was a Wolf elective (a Tiger Adventure today). After pricing several different birdhouse kits at our local garden center ($$$), I remembered that my father had built his own birdhouses which he had placed out on his farm. I learned that he used these very same “one-board” birdhouse plans! After purchasing eight boards, a box of nails, and a box of deck screws (I used stainless steel) from the local lumberyard, I saved approximately 70% compared to the other kits. My Dad helped me pre-cut and drill* the pieces in his shop, so that all my Cubs had to do was assemble the birdhouses (after all, pounding nails is the fun part!). *My Dad suggested drilling pilot holes for the nails as well as the screws, to aid the boys in driving the nails in straight. This helped immensely, as this project proved to be the first time that any of my Cubs had ever used a hammer (and also a screwdriver!).
A few days before the Den meeting, I stopped by a tool supply house to pick up an extra hammer. I had learned early as a Den Leader to have enough tools/utensils on hand for our crafts/projects to eliminate any conflicts. For less than the price of a new 16-oz. hammer, I acquired eight, 8-oz. hammers that proved to be the perfect size for young boys to properly learn how to drive nails. “Grandpa” attended our Den meeting that week to lend a hand. He showed the Cubs how to grip and use the hammers which resulted in hitting the nail on the head every time! Another helpful tip that he taught us (grown-ups included) was to rub some wax on the screw threads to make driving the screws into the wood much easier! My Cubs remembered this simple project as one of the most fun den meetings in their Cub Scout careers!
IMPORTANT! Don’t forget to use eye protection in all of your Cub Scout woodworking projects!-
Those pilot holes are essential!
I love that the boys get to do wood projects in Cub Scouts! Nothing like the seeing the satisfaction on a little guy’s face when he completes a project like this.
Thanks for the tip about 8 oz. hammers!
-
Leave a Reply