
- Cub Scout Activities
- |
- Cub Scout Arrow of Light Adventures & Requirements
- |
- Cub Scout Webelos Adventures & Requirements
How to Make Air Rockets
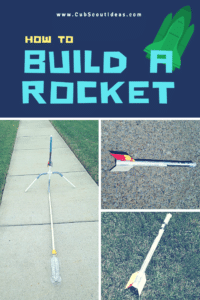
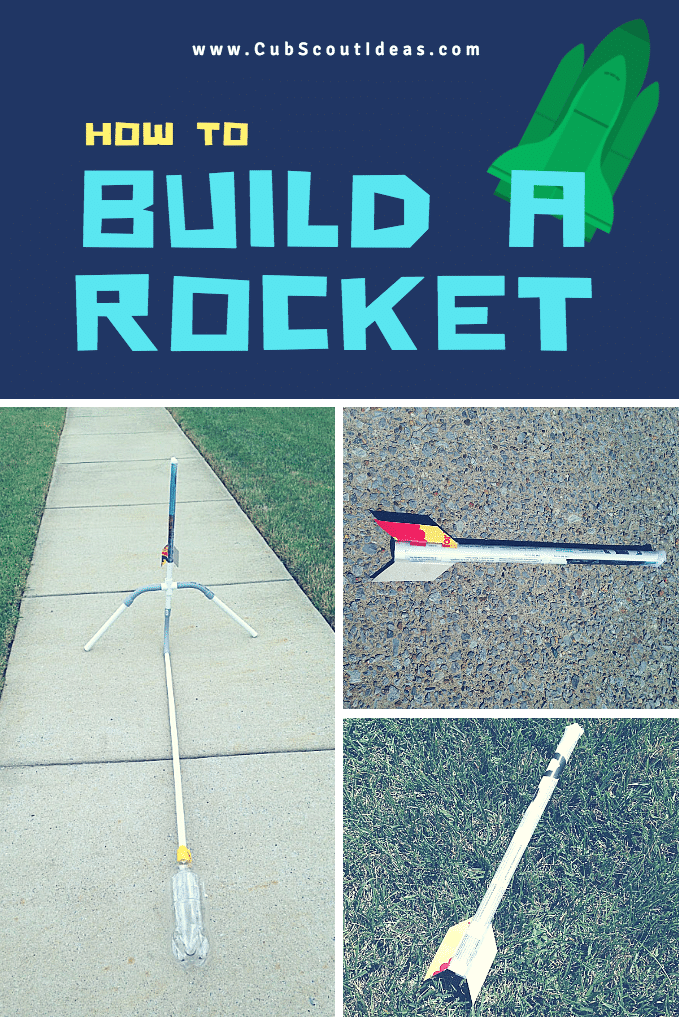
Recently, I told you about the awesome air rocket launcher I built. Here are the instructions for the actual rocket that you’ll launch with your rocket launcher! 🙂
When the rocket lands, it may crumple a bit, but you can smooth it out and use it again. We were able to shoot off a rocket about 10 or so times before the paper tore, and it had to be discarded.
One of the things I love about this rocket is that it’s made mostly from recycled materials–old magazines and cereal boxes. Using resources wisely is a great lesson for our Cub Scouts to learn.
What you’ll need:
- 2′ piece of PVC pipe
- Duct tape
- Old magazine (the kind that’s stapled in the middle)
- Cereal box cardboard
- Tape
- Plastic wrap (such as Saran Wrap)
- Scissors
- Ruler
- Fin pattern
What you’ll do:
- Tear off a piece of duct tape about as long as the PVC pipe.
- Lay the PVC pipe on the duct tape near the middle.
- Carefully wrap the tape around the pipe trying to avoid air bubbles.
- Use another piece of duct tape to cover the part of the pipe that isn’t already taped and set aside. This is your rocket former.
- Carefully remove the staples from the middle of the magazine.
- Stack two magazine pages evenly together and roll them tightly around the rocket former. If they seem loose, unroll them and start again. The pages should be placed so that they’ll make the longer rockets.
- Tape along the seam.
- Carefully slide the rocket until it is about 1/2″ beyond the end of the rocket former.
- Take a 1″ piece of tape, and fold it over the end of the rocket to secure the inside seam.
- Leave the rocket on the former, and set aside for now.
- Print the fin pattern. You’ll need 2 fins.
- Cut around two of the fins, and tape them to the cardboard.
- Cut the fins from the cardboard. Cut the three short solid lines, but don’t go past the dotted line.
- Fold on the dotted lines. The easiest way to do this is by using a ruler as a straight-edge and pulling the tabs up.
- Bend the first and third tabs in the opposite direction.
- Tape one of the fins onto the end of the rocket that you taped earlier. Tape two tabs on one side of the fin, and two tabs on the other side.
- Repeat with the other fin onto the other side of the rocket.
- Slightly bend the edge of the fin.
- Carefully slide the rocket toward the other end of the former until about 1/2″ of paper is exposed.
- Fold one side of the exposed paper over the top of the former. Continue folding until the paper covers the end of the former.
- Using 4 – 3″ pieces of tape, tape down the top so that it is well sealed.
- Tear a 6″ piece of the plastic wrap and crumple it up. Tape it onto the secured end of the rocket.
- Carefully slide the rocket all the way off of the former.
Now, you’re ready to launch!

Place the rocket on the top of the launcher. Stomp hard in the middle of the soft drink bottle, and watch your rocket blast off!

After each launch, you’ll need to reinflate the soft drink bottle. Start by squeezing the middle of the bottle so that the plastic pops out a bit. Then, wrap your hand around the top of the vertical pipe, make a fist and blow into the top of your fist.
Let me know what your Scouts think!
Yours in Scouting,
Sherry
P.S. If this activity was fun for your Cub Scouts, sign up below for more cool ideas!
How to Make Air Rockets
Recently, I told you about the awesome air rocket launcher I built. Here are the instructions for the actual rocket that you'll launch with your rocket launcher!
When the rocket lands, it may crumple a bit, but you can smooth it out and use it again. We were able to shoot off a rocket about 10 or so times before the paper tore, and it had to be discarded.
One of the things I love about this rocket is that it's made mostly from recycled materials–old magazines and cereal boxes. Using resources wisely is a great lesson for our Cub Scouts to learn.
Materials
- 2′ piece of PVC pipe
- Duct tape
- Old magazine (the kind that’s stapled in the middle)
- Cereal box cardboard
- Tape
- Plastic wrap (such as Saran Wrap)
- Fin pattern
Tools
- Scissors
- Ruler
Instructions
- Tear off a piece of duct tape about as long as the PVC pipe.
- Lay the PVC pipe on the duct tape near the middle.
- Carefully wrap the tape around the pipe trying to avoid air bubbles.
- Use another piece of duct tape to cover the part of the pipe that isn’t already taped and set aside. This is your rocket former.
- Carefully remove the staples from the middle of the magazine.
- Stack two magazine pages evenly together and roll them tightly around the rocket former. If they seem loose, unroll them and start again. The pages should be placed so that they’ll make the longer rockets.
- Tape along the seam.
- Carefully slide the rocket until it is about 1/2″ beyond the end of the rocket former.
- Take a 1″ piece of tape, and fold it over the end of the rocket to secure the inside seam.
- Leave the rocket on the former, and set aside for now.
- Print the fin pattern. You’ll need 2 fins.
- Cut around two of the fins, and tape them to the cardboard.
- Cut the fins from the cardboard. Cut the three short solid lines, but don’t go past the dotted line.
- Fold on the dotted lines. The easiest way to do this is by using a ruler as a straight-edge and pulling the tabs up.
- Bend the first and third tabs in the opposite direction.
- Tape one of the fins onto the end of the rocket that you taped earlier. Tape two tabs on one side of the fin, and two tabs on the other side.
- Repeat with the other fin onto the other side of the rocket.
- Slightly bend the edge of the fin.
- Carefully slide the rocket toward the other end of the former until about 1/2″ of paper is exposed.
- Fold one side of the exposed paper over the top of the former. Continue folding until the paper covers the end of the former.
- Using 4 – 3″ pieces of tape, tape down the top so that it is well sealed.
- Tear a 6″ piece of the plastic wrap and crumple it up. Tape it onto the secured end of the rocket.
- Carefully slide the rocket all the way off of the former.
Now, you’re ready to launch!
15 responses
-
Thanks
Leave a Reply