
Cub Scout Project Idea: DIY Chess Board
When my older son was a Webelos, our den made a chess set from nuts and bolts as part of an old requirement. It is still a fun activity for the Cub Scouts!
I wanted a chess board to go with the pieces. Finding an inexpensive way to make the boards was important. I turned to Pinterest and other online sources and wandered around Lowe’s, but I couldn’t find anything that wasn’t wood.
I remembered that I had some glass etching cream left over from the leader appreciation gifts that I made. So, the next step was to find something glass to etch!
Picture frames came to mind, but we had three challenges. First, the frames would need to be square. Second, they would need to be small because our pieces are small. Third, they couldn’t cost very much. I found these 8″ x 8″ picture frames, and they were perfect!
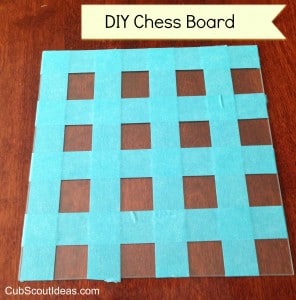
The first step in etching the frame is to tape off the frame in squares. I used 3/4″ wide stencil tape to make a checkerboard pattern. Use a craft knife to cut out the squares where there are two layers of tape.
The easiest way for me was to use a ruler and cut all the way across the tape (even the pieces that I was not going to remove) then pull up the double layered squares.
After you have removed all the pieces, press around the edges of the tape that is left to ensure that it has adhered to the glass well. Use a paper towel to wipe the exposed glass to remove any fingerprints.
For the next step, the Scouts moved to the garage where I had set up a table. We explained how the etching cream would work and that we needed to be very careful using it. It’s relatively safe, but it is an acid.
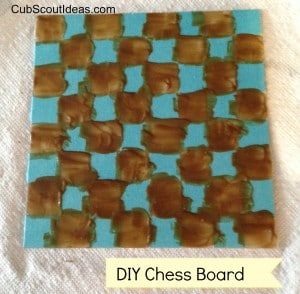
We put the taped off glass on a paper towel. Don’t forget to have the kids write their names on one of the blue squares.
The Scouts then applied the etching cream to the glass with a paint brush. Use a fairly thick coat of cream. In this picture, the Webelos probably should have used a bit more.
The etching cream takes several minutes to process. Be sure you have an activity for them to do during the wait time. After it finishes processing, rinse the cream off. It’s probably better for an adult to do this.
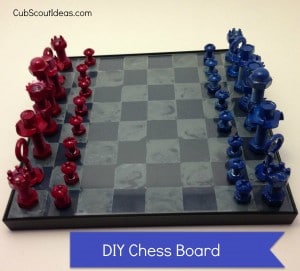
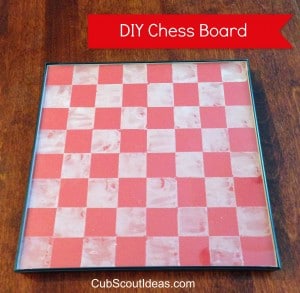
After the glass was rinsed, they took all the tape off. They were so surprised to see what the glass looked like. I told them they could pick out any color paper they wanted (from my scrapbook stash) to put behind the glass, but most of them just wanted to use the black backing that came with the frame. We put the etched part of the glass facing inward on the frame so the side facing out was smooth.
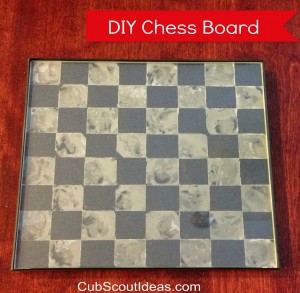
Here are two of our final chess boards!
Which is your favorite–red or black? Leave me a comment and let me know!
Yours in Scouting,
Sherry
P.S. If you liked any of these suggestions, sign up below for more fun Cub Scout ideas!
17 responses
-
[…] sure to make your own chess board […]
-
[…] 10. Build a chess set out of nuts and bolts and a chess board out of a picture frame. […]
-
I think this is an awesome idea. I went tonight for the boys to decide what they want to do and this item made the list of items they wanted to make. Thanks for the great idea.
-
So glad you like it! We really had fun making them.
-
-
I would like to do this project at our day camp this year. I am expecting about 85 boys. How much etching cream did you use for the small group of boys that you had? I have no idea how much to buy!
-
So fun! I did a very rough estimate, and each boy needs about 3/4 of an ounce. Knowing boys, I would probably round up to an ounce each.
Let me know how that works for you. Thanks for reading!
-
I’m curious if you did this at day camp this year. Did it turn out as you hoped? Did the kids like it? Was there a lot of broken glass?
-
-
Nice project. For the etching cream, about how long did you leave it on the glass? The bottle doesn’t indicate any timing.
-
So glad you liked it! I left mine on for about 15 minutes.
-
Thanks for all the tips. The etching cream didn’t seem to make the white as “pronounced” in your photographs. I thought I used a generous amount, but its much more sedated from what you pictured. I guess the notion “Results” may vary applies here 🙂
-
-
-
Awesome idea the red one is great.
-
Thanks! So glad you like them.
-
-
[…] sure to make your own chess board […]
-
Great project. I had the toughest time finding a cool, do-able chess board to go with our nuts ‘n’ bolts chess sets. And the boys will use these to learn chess as part of their Scholar Badge. Thanks for sharing the idea.
-
So glad you like it!
-
-
You are a genius!!! I CANNOT wait to do this- and there is the CHESS beltloop and pin we can tie in!!
EXCELLENT job and AMAZING creativity!!
THANK YOU!!!!!
-
Thanks so much, Malissa! Hope you have as much fun with this as we did!
-
Leave a Reply